
Google Tag Manager (GTM) is a free Google product released to help Webmasters simplify website tracking of activities. A lot of ‘tags’ are added whenever we create a website, such as when we add a new post, we add ‘tags’ to identify the content. Similarly, we add advertisement and tracking codes like Google Analytics. The website code counts it as tags and as the website manager; you need a better way to manage tags. In this tutorial, you’ll learn how to setup Google Tag Manager in WordPress.
What is Google Tag Manager?
The GTM is an interactive interface from where all the tags in a website can be managed and monitored.
Often, when we have to add JavaScript codes like social buttons and advertisement codes, we either depend on plugins or manually edit the theme code. While code editing can’t be done by everyone, adding too many plugins on a WordPress website will seriously impact the site speed. Then GTM (Google Tag Manager) is your solution.
With correct GTM implementation, you can easily add and remove tags anytime. Since Google will load the tags asynchronously, the website speed will not become slow.
Before I move forward, check out this introductory video from Google.
How to Setup Google Tag Manager on WordPress Blog for Google Analytics?
There are a lot of things you can setup Google Tag Manager for and we will cover all of them eventually. In this tutorial, we’re simply going to learn how to setup Google Analytics through GTM.
Google Tag Manager Setup – Step 1
Login to GTM with a chosen Google account.
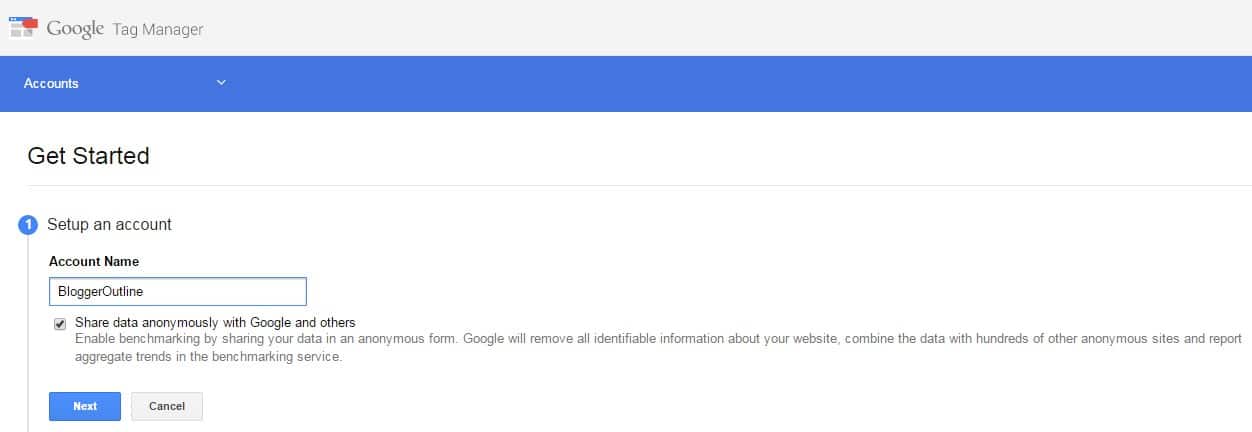
Step 2
Setup the Account name. If you’re running a blog, use the blog name as the Account name. If you’ve a business under which a lot of websites are operated, use the business name. Choice is yours.
Step 3
Setup Container. The Container is like a storing space where all associated tags will be stored. I created the Container in the name of my business website and chose Web Pages for tracking the domain.
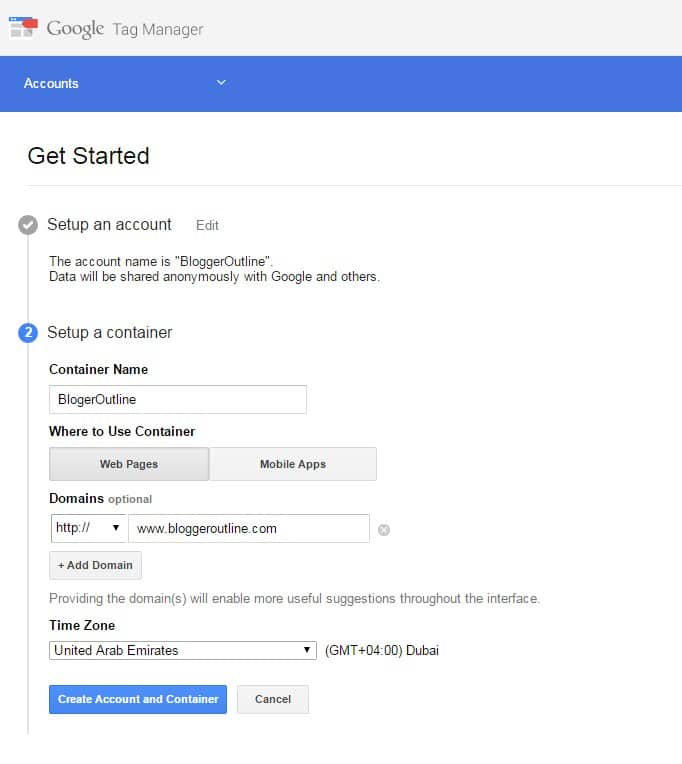
Step 4
Click on Create Account and Container.
Step 5
Click on I Accept for Google Tag Manager Terms of Service Agreement.
Step 6
The next page shows the Container code for the website. Note that the code isn’t Published yet. Also, below you can see a list of tags which can be associated with the website.

As stated before, we’ll see how to setup Google Analytics with GTM.
Step 7
Copy the code and place immediately after the opening <body> tag. It is where you usually add Google Webmaster and Google Analytics code. If you’re unsure, you can use this plugin but it is strongly recommended to add the code manually.
Step 8
Login to Google Analytics. Note down the tracking ID from Admin > Tracking Info > Tracking Code.
Step 9
Add the tracking ID as you see in the screenshot below. Keep the Tag Name same as the purpose. Click on Enable Display Advertising if you’re using Google AdSense as it will generate further data. The Track Type should be Page Views and create the tag.
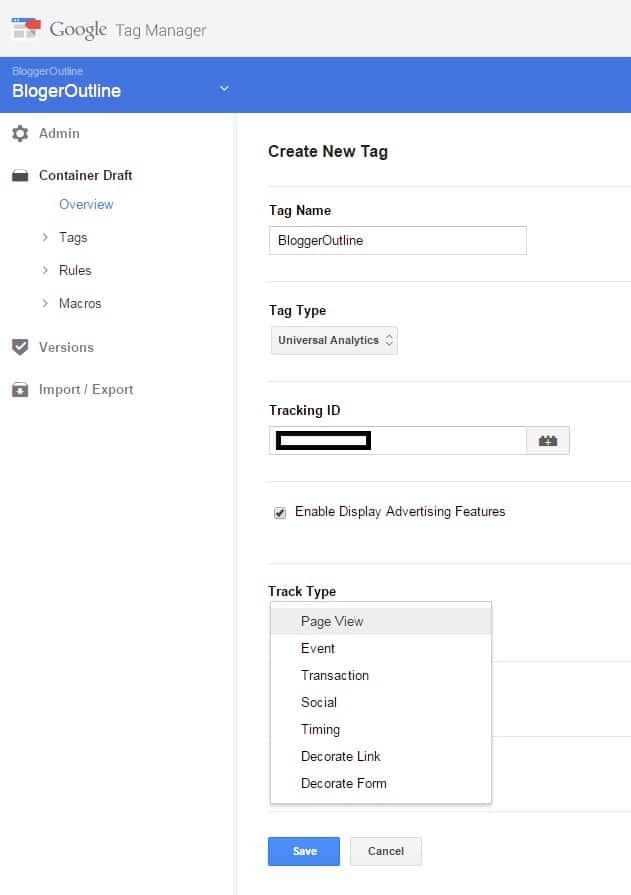
Track Types

Step 10
Click on Google Analytics. Select +Add in Firing Rules. This is where you state when the tag will be fire. Since it is Google Analytics, it has to run on all Pages and click Save and again Save at the end of the page.
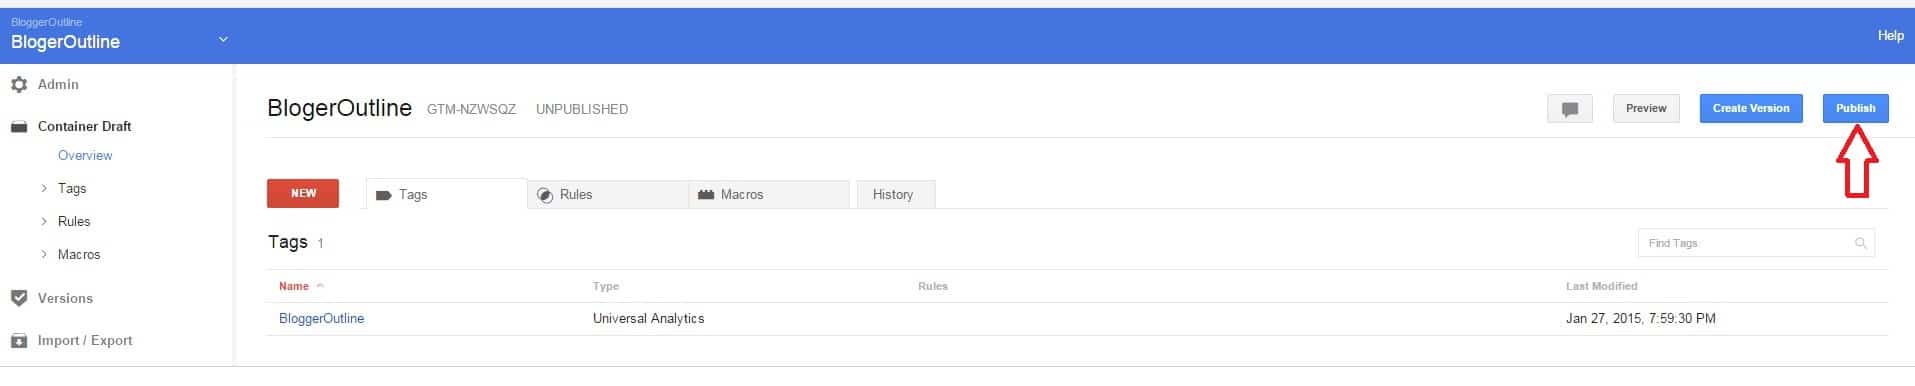
Step 11
Again, the Google Analytics tag isn’t published yet. Click on Publish. Click on Create Version and Publish.
…and you’re done.
Check whether Google Analytics is receiving data after 4-6 hours and you’ll know whether everything went right or not.
I hope you were able to implement this tutorial.
Similarly, if you’re adding a lot of advertisement scripts like Buy Sell Ads, you can do it this way. Sign up to our newsletter (on sidebar) to receive updates of future Google Tag Manager Setup tutorials.
Learn more about GTM features.